Google+
Showing posts with label washi tape. Show all posts

Wednesday, February 24, 2016

DIY Fairy Door Tutorial

Make Your Own Fairy Doors (with Washi Tape!)

Pixie Dust Not Included ;)
 

Inexpensive Fairy Door

My daughter wanted a fairy-themed birthday party this year, and with my penchant for craft-focused activities, I decided the girls (yup, we had all girls here--13 kindergarten crafters) could make some (super-easy) fairy doors.

The idea stemmed from some momma rumblings I'd heard about these fairy doors that many of their daughters were going crazy about. Initially I thought I could grab some (for cheap) and use them as favors... until I realized these {magical} doors are being sold for upwards of $20! Soooooo... scratch that idea. Hence, I put together this easy, CHEAP, DIY version... a perfect fairy-themed party craft for 6-year olds.

Thursday, February 12, 2015

Washi Tape Toothpick Flags

Serve Up Some Finger Food in Style

Or Dress Up Your Candy-Free School Party Snacks


Cute Appetizer Ideas

Ooh how I love this super-easy toothpick hack. These are my favorite kinds of projects... meaning, I guess, the ones that take longer to photograph than they do to make ;) All you need to do it break into your washi stash (or go grab a couple rolls from the craft store), find some toothpicks, and you're ready to go.

Saturday, May 25, 2013

Washi Tape Flag S’mores Sticks

Roast Those Marshmallows in Style

No More Mixing Up Sticks! 


Yay! It’s finally almost summer. So excited for warm days and nights, kiddos running barefoot on the lawn, catching fireflies… and S’MORES! I love these giant marshmallow-roasting sticks they have available now (I got mine for $1 at Christmas Tree Shops). I don’t like throwing them out after just one use, but then I realized we’d never remember whose was whose unless we marked them (although in reality, I have no objection to sending the kids into the woods to look for sticks, like we used to do). But I wandered into my craft room, looking for a marker, my glance landed upon, yup, my new WASHI TAPE collection (these washi projects are starting to grow on me). Perfect!


Easiest fix ever. And so pretty. You could do a lot of different things with this idea. I already have some plans to have kids decorate and keep their own at B1’s birthday party in July!


Now, storage! I got this galvanized urn at Joann’s (with my 40% coupon, of course; about $7 after discount, but you could do better than that, I was in a rush). I painted a rectangle with chalkboard paint, allowing us to change the message depending on the occasion. Filled the urn with sand, and arranged the sticks!


Now with such pretty sticks, the marshmallows needed some prettying up, too! Enter the fancy Italian glass container (a whopping $5.99 from Christmas Tree Shops).

Even if it’s one of those days that’s too hot for a fire, this display makes a cute centerpiece for a summer party (maybe paired with my ruffled tablecloths), and when the time is right, you don’t have to do much work to break out the key ingredients for S’MORES! Just add the graham crackers and chocolate!


 Linking up to: Savvy Southern Style


nap-time creations

Thursday, May 9, 2013

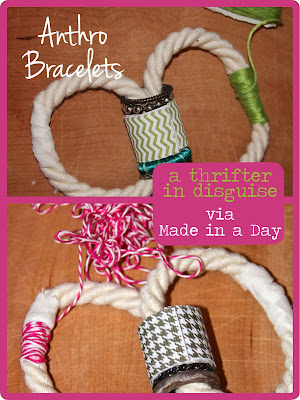
Rope Bracelets via Made in a Day

Anthro-Style Rope Bracelets

made using Made in a Day tutorial 


When I first saw Kim from Made in a Day's Anthro-inspired rope bracelets, I was immediately in LOVE! I believe I called her a genius. And I could not get those beautiful bracelets out of my head! So off we (me and B3) went to the craft store(s).

First stop was Joanns. I got the rope there (in the by-the-yard trim section near the curtain materials). I got three yards because it was pretty cheap ($2.99/yd) and I used my 40% discount (I still have about a yard left after making these). I looked at the beads and stickers there, but I couldn't find anything that had a wide enough opening for the rope. So I plopped the baby back in the car, drove across the road to Michaels, and resumed my search there.


Michaels' selection was much better for this particular project (although I generally prefer Joanns--you can use more coupons, and I like their app better... but, I digress). I found the same beads Kim used, and I even used the same cardboard tube (from the neon bracelets in the $1 section). I couldn't find the same stickers she used, but I found these, and I was happy with them. I also decided to try washi tape on one, too (the blue ikat pattern). I used the floss/thread in the pic because I liked the colors and they were pretty inexpensive, but you could do it with whatever kind you wanted. 


And so, the process:
  • Cardboard Beads: I had some issues cutting the cardboard neatly. Partly because I'm a bit of a klutz, and partly because our kitchen knives are really dull... should probably fix that, but thinking about sharpening them kinda freaks me out. Anyway, I got it done, but you can see in the pics the edges are pretty rough. Oh well. I used a glue gun to tape the stickers around (no glue gun for the washi bead, though). That part was pretty fun!
  • Stringing the Beads: Pretty self-explanatory--just don't forget to do this before you glue the ends!
  • Gluing Ends: I'm not very good at fine motor stuff, so the gluing of the ends was a bit messy for me, but the floral tape definitely helped cover up those messes (I'm not exaggerating--mess!). I'd never used floral tape before, but it was cool: very malleable and forgiving. I found in it an off-white color, so that was a bonus.
  • Wrapping: Yep, Kim mentioned this: it's a little tricky at first. You can see from my pics. At first I was working with a complete knotted mess, and I had to stop to untangle every few rounds. Not too fun. But then I got into the groove and approached it a little more neatly (and slowly-see green thread example). It was tricky covering the tape with no gaps, so I just went back over it in the other direction to cover everything I missed.
All in all, this project was great! It was really quick, so pretty, and just in time for summer! I definitely like Kim's better, but I'm still happy with how mine turned out. I highly recommend giving these a shot if you're considering it. Here's the link to Kim's tutorial: Made in a Day DIY Rope Bracelets. And check out her whole blog while you're there--she's got so many beautiful projects!


Made in a Day


Linking up to:  
Made You Look Linky
Craftionary
Frugal Friday
Do Something Crafty
Friday Flair

Monday, April 29, 2013

Washi Tape Kids Collection Jars


DIY Collection Jars for Kids

Upcycled Washi Tape Craft from Peanut Butter Jars
 

Peanut butter is very popular at our house, which is great because it's quick and easy, but it's always bothered me to just throw the plastic jars in the recycling bin when we're done. And like any parent, I'm always looking for activities to entertain my little ones. One day we were playing outside, and I was being brought beautiful flower (i.e., dandelion) after beautiful flower. To save myself from having to come up with original, excited reactions to each new offering, I suggested they make a collection first, then bring their whole collection to show me. And, bingo! It hit me: they needed collection jars!

The original collection jars were not so pretty... they were simply the peanut butter jars, sans labels. But I wanted to "pretty them up," and I had yet to play around with washi tape, so I gave this a shot, and my girls were thrilled with how they turned out. They even decorated their own. The washi tape was especially awesome for them because they could rip it themselves and reapply it easily when they wanted to reposition their designs (which they did constantly). I think the only drawback to the washi tape is that it's a little pricey, but if you use your 40% off craft store coupon, it's not so bad.


To get the jars ready, I cleaned them out and used Goo Gone to get rid of the glue residue. I applied a few rows of washi tape on each one. I used my rotary cutter to get a straight line on the edges (but be careful if you try that). They still looked a little plain, so I decided to make labels by painting Avery address labels with chalkboard paint (I think it took about 3 quick coats).

And that was it! Let the collecting begin.