Google+
Easy, Cheap, and Quick Decorations for Fall
Make a cute bunting from leftover materials and save $!
With the nights getting colder and the official arrival of fall, I was craving some autumn decorating, but I didn't have the motivation to get in the car and go to the craft store. In an effort to satisfy my instant-gratification "itch," I tore apart my craft room and came up with this quick and easy solution: Burlap Bunting with a Chevron Trim.
Burlap Bunting with Chevron Trim Tutorial
Materials:
- Burlap Chevron Ribbon (I got mine from Hobby Lobby and had left over from our Scavenger Hunt)
- Scraps of Burlap
- Hot Glue Gun
- Scissors
- Twine
Directions:
- Make the triangles: Cut your scraps of burlap into triangles of desired size. I made six {roughly} equilateral triangles with sides about 6" long.
- Add the ribbon: Using a hot glue gun, adhere the ribbon to the top of each triangle, overlapping at the ends. Then snip of the excess ribbon to maintain the triangular shape.
- Add the twine: At first I tried to weave the twine through the top of the ribbon, but that was a big pain, so instead I glued it onto the back.
- Measure and repeat: Decide how big you want your gap between the triangles to be. I ended up with about 7" of twine between each pair (this was through trial and error, I started with 10" and slowly decreased it to 7"). Then finish up by gluing the twine to the back of each triangle.
- Adorn something! You can see that my bunting went on a little photo shoot... the trees, different mantels, planters... it's ended up back in my family room, but it was fun seeing how it looked in other places, too.

This was totally easy project that's helped me get into the mood for fall... although it could easily be used for birthdays or other occasions,
too!
Anthro-Style Rope Bracelets
 When I first saw Kim from Made in a Day's Anthro-inspired rope bracelets, I was immediately in LOVE! I believe I called her a genius. And I could not get those beautiful bracelets out of my head! So off we (me and B3) went to the craft store(s).
First stop was Joanns. I got the rope there (in the by-the-yard trim section near the curtain materials). I got three yards because it was pretty cheap ($2.99/yd) and I used my 40% discount (I still have about a yard left after making these). I looked at the beads and stickers there, but I couldn't find anything that had a wide enough opening for the rope. So I plopped the baby back in the car, drove across the road to Michaels, and resumed my search there.

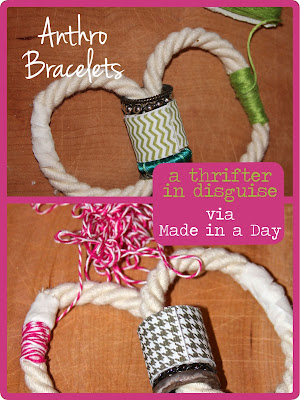
Michaels' selection was much better for this particular project (although I generally prefer Joanns--you can use more coupons, and I like their app better... but, I digress). I found the same beads Kim used, and I even used the same cardboard tube (from the neon bracelets in the $1 section). I couldn't find the same stickers she used, but I found these, and I was happy with them. I also decided to try washi tape on one, too (the blue ikat pattern). I used the floss/thread in the pic because I liked the colors and they were pretty inexpensive, but you could do it with whatever kind you wanted.
And so, the process:
- Cardboard Beads: I had some issues cutting the cardboard neatly. Partly because I'm a bit of a klutz, and partly because our kitchen knives are really dull... should probably fix that, but thinking about sharpening them kinda freaks me out. Anyway, I got it done, but you can see in the pics the edges are pretty rough. Oh well. I used a glue gun to tape the stickers around (no glue gun for the washi bead, though). That part was pretty fun!
- Stringing the Beads: Pretty self-explanatory--just don't forget to do this before you glue the ends!
- Gluing Ends: I'm not very good at fine motor stuff, so the gluing of the ends was a bit messy for me, but the floral tape definitely helped cover up those messes (I'm not exaggerating--mess!). I'd never used floral tape before, but it was cool: very malleable and forgiving. I found in it an off-white color, so that was a bonus.
-
Wrapping: Yep, Kim mentioned this: it's a little tricky at first. You can see from my pics. At first I was working with a complete knotted mess, and I had to stop to untangle every few rounds. Not too fun. But then I got into the groove and approached it a little more neatly (and slowly-see green thread example). It was tricky covering the tape with no gaps, so I just went back over it in the other direction to cover everything I missed.
All in all, this project was great! It was really quick, so pretty, and just in time for summer! I definitely like Kim's better, but I'm still happy with how mine turned out. I highly recommend giving these a shot if you're considering it. Here's the link to Kim's tutorial: Made in a Day DIY Rope Bracelets. And check out her whole blog while you're there--she's got so many beautiful projects!
Linking up to:
Made You Look Linky
Craftionary
Frugal Friday
Do Something Crafty
Friday Flair