Google+

Friday, August 30, 2013

Preparing Lunches {well, really me} for Kindergarten

Healthy, Bento-Style Kids School Lunches

A Not-So-Prepared {for Kindergarten} Mom Preparing a Fun
{for Kindergarten} Lunch


No matter what the circumstances, I don't think I would ever be prepared for my baby to start kindergarten. I remember when B1 was an actual baby, and I would hear people talk about their kids starting kindergarten, and I saw those kids as being so old. Funny to look back on that now. Because today my own baby started school... and she probably looks old to a lot of other new parents. And as I walked her to her classroom, new backpack and lunchbox on hand, I hoped for the best for her... but I knew at least she'd be covered in the food department :)


Last year I heard an interview on NPR with Debra Samuels, the author of the book My Japanese Table. In it, she described her experience making school lunches as an ex-patriot mom living in Japan. My favorite quote in that interview: "After her young son started complaining that the peanut-butter-and-jelly sandwiches she was packing for him weren't 'cute enough' for kindergarten, Samuels embraced the Japanese food aesthetic." Listening, I was captivated by the interview... maybe it was the simultaneous ridiculousness but cuteness of the baloney bangs that did me in. And while I don't think I'll ever be able to cut a carrot into a flower (or adorn my kids' sandwiches with baloney bangs, for that matter), something about the Japanese food concept really stuck with me. Samuels described food in Japan as being a very visual experience, and she soon adapted her son's school lunches to follow that theme.


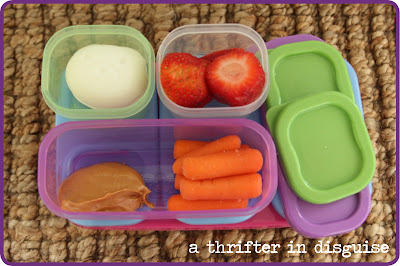
Thus, my inspiration for B1's lunches and snacks this week. I'm trying to emulate the Japanese kids-lunch style, and I've started off with the bento-like containers. Since I've had good success with Sistema products in the past, I'm still using those, but I decided to give these Rubbermaid Lunch Blox (they're cheaper at Target: $14.99) a try. I really like this concept, because the individual containers AND ice blocks all click together (two birds with one stone here). So I'm {very hopefully} giving them a shot, and I'll keep you posted on how they hold up with every day use.


The other new addition to her lunches? With molds straight from Japan (via Amazon: Kotobuki Mold), I made hardboiled eggs shaped like bunnies and bears, utilized these cute little reusable animal forks (via Amazon: Bento Decoration) for some ham and cheese rolls. She hasn't seen those yet; I can't wait to hear about her reaction when she sees them :)


And so here I am, preparing my daughter's lunches for kindergarten. And while I'm not quite emotionally prepared for the fact that my little girl is growing up so fast, I'd like to think that, nutritionally, I'm heading in a positive direction, just like those clever Japanese moms. And most importantly, I got good reviews about lunch from my little kindergartener today! 


But, please, I'm still looking for more... any bento-style kid lunch success stories out there? I'm hungry (yup, pun intended) for more ideas!


Sources for some of the other stuff in the pics:

Lunchbox: Dabbawalla Bags Flower Power II Lunchbox
Dress: Tea Collection (post here)
Boots: Nina Cowgirl Boots ($24.99 from Marshalls)

Backpack: Mini Boden (promotion from a couple years ago. I saved it. Yea, I'm a bit of a planner)

Monday, August 26, 2013

No Frills, Space-Saver Boo-Boo Kit

DIY Kids Boo-Boo Kit 

Easy, Compact, and Inexpensive First Aid Kit 


So here's my epiphany of the week: when you have little kids, there is no where you can go that you might not need a band-aid.  I don't know why it took me so long to realize this, but I've stopped trying to fight it.  

Picture this: you're running out to Starbucks on a Saturday morning to grab a quick coffee.  One of the kids wants to come, too.  Sure, you think, now that she can buckle her own seat belt, bringing her along is easy!  Well, it is easy, and fun... up until the point where she trips on a curb while she's getting out of the car and scrapes her knee.  And, BAM!  That's where it stops being easy.  Because you can see that it's only a little scrape, and really, it will be fine until you get home and wash it.  But she doesn't share your opinion.  She is crying.  And the more you reassure her, the more she cries, and the louder she becomes.  And you're right outside Starbucks... you can SMELL the coffee.  You can practically taste the coffee.  But you can't, in good conscience, drag your screaming, suffering child into Starbucks just because you need your coffee.  So what do you do?????  EASY. You whip out your simple DIY Boo-Boo Kit. Because any caregiver knows what a difference a band-aid can make. And how a scrape or cut can strike at any time: in the middle of Old Navy, walking out of church, playing Monopoly (those paper cuts can come out of nowhere)!


I've gone through several iterations of boo-boo kits, and somehow I never seem to adopt one of those versions permanently. For example, having an ice pack on hand to help with the bumps and bruises is great, but it takes up prime real estate in the purse.  Ditto with gauze and medical tape.  And what ends up happening?  Well, I take out out the kit when I need to make room for something else.  And then, inevitably, someone falls down, becomes inconsolable, and needs a band-aid.  And I don't have one.

So here's my new version.  Some is for me, some is for the kids, but this new kit includes all of the most frequently-used ailment-fixers in our household.  I'm going to try it out for a little longer, but so far, it's served me well.


DIY Boo-Boo Kit For Anyone Who Takes Care of Kids 
  • Zippered Case: I like the clear ones, that way I can see what's in there without having to pull everything out each time. I got mine in the dollar bin at Target.
  • Neosporin Wound Cleanser: This stuff is awesome. It cleans out the cuts/scrapes and applies an antiseptic
  • Band-aids: Target has really inexpensive up&up band-aids (only sold in stores) that come in cute designs. They're less expensive than the "character" versions, and I actually like the designs much better. I throw in a few different designs so the kids can pick which one they want. Getting them involved usually helps cut down on the tears and nervousness, too!
  • Benadryl: I grew up with a sister with severe food allergies, so I know how important it is to have Benadryl on hand in case of an emergency. Unfortunately, they keep changing their products and/or having recalls, so it's hard to make a good recommendation about what version to use. The regular liquid container is a little large for my tastes, so right now I carry the Fastmelt Tabs in my kit (although when I looked for the link, it says the product is discontinued... hard to believe since I only bought it a month ago). Sometimes they offer the smaller, "Perfect Measure" spoons, which are also easy to throw into a kit. So, do your research, and get what you're comfortable with.
  • Small Tweezers: Those wooden playgrounds great for splinters :)
  • Pain Reliever Tablets (these are only for adults!): I keep a travel-sized container with Advil and Excedrin. Because I get headaches at the most inopportune times.
  • Tums: They make them in small rolls that take up very little space.
  • Lollipops: Next to a band-aid, this is the best boo-boo distraction.  I put a few Dum-Dums (also tiny) in mine because I know there will likely be a supportive sibling or friend nearby.


The other great thing about having one of these kits on you is that you can share. Kids are always getting hurt, and having this may help out another mom or dad who recently (now regrettably) abandoned their over-sized boo-boo kit for more space. And how great does it feel to help someone out who got an unexpected headache in the first act of the Five-act Elementary Holiday Pageant?

Easy enough! What other small items do you keep in your essential kits?

Thursday, August 22, 2013

How to Buy Name Brand Kids Clothes & Still Stick to Your Budget

Love An Expensive Clothing Brand But Don't Love the Price?

Just a little compromise can still give you a lotta look!

I love the Tea Collection clothing lines. I love the styles, and I love the way the fabrics hold up. Even after going through a lot of wear with both girls, the shape and colors of the pieces still look great. Which is why I always like to have one or two Tea Collection dresses in my girls' wardrobes for back-to-school time.
Tea Collection
Great Wall Striped Dress
And even though it's a bit pricey, I'm comfortable spending around $30 for a dress that I know is going to last (especially when it can be handed down to B2!), but I just can't rationalize spending $24 on a pair of leggings to go with it.  Hey, call me cheap, but to spend almost $60 on a single outfit for a little kid is just too much for me.  So, I fake it.

I always buy from Tea when there is a promo code (currently, there's a 10% code right on their site, but the code bejing15 will save you 15% for a limited time, although I think it may only be for first-time Tea buyers).  Then, I stock up on inexpensive leggings to pair with the adorable dresses, and, VOILA! No one knows the difference. Don't get me wrong, the "generic" leggings are quite as adorable as the originals, but I can stand that. I'd also consider the Tea quality to be a little better than the "generic", but again, it's not enough to get me to spend over four times the price for a pair of leggings that will most certainly get abused.

Tea Collection
Yangzi Floral Shirtdress


So where do I get these "generic" leggings? Well, Walmart's leggings are actually my number one source because you can get toddler sizes (Granimals: to 5T) for $3.88 or girls sizes (Faded Glory) for $4.97. I have to admit, I'm not the biggest Walmart fan, but in this case, it really helps me save money on my back-to-school shopping, so I go with it.  Target also has them pretty cheap; I think they're regularly $7.00 for the Circo leggings (although right now they're on sale for $6.00, and you can catch them on clearance for even less than that sometimes). H&M has a lot of colors and styles, but in my experience, the quality of H&M's kids leggings is lacking (last year B1 got a huge hole in hers after one wear).

Walmart
Faded Glory Leggings


And, really, that's it. My little secret. And it's just tricks like that that help me keep my kids looks stylish without breaking the bank. Hence the whole "thrifter in disguise" thing.

And no, the Tea dresses aren't as inexpensive as my go-to H&M play dresses (which is why I call them play dresses), but they're so much more versatile (and much better made). They girls will wear them for school, birthday parties, and even holidays (perfect for Thanksgiving dinner; I've never liked buying entirely new outfits for one day). Throw a cardigan over the dress or a long-sleeved tee-shirt under it and they can even wear them through the winter months. 

Well, maybe I'm not emotionally ready for back-to-school, but at least I've got two less wardrobes to worry about!

Tea Collection
Modern Dot Bubble Dress

Monday, August 19, 2013

Beach Scavenger Hunt Birthday Party

Beach Scavenger Hunt Birthday Party

Great DIY Birthday Activity for Kids 2-12

Summer Days May Be Winding Down, But a Beach Scavenger Hunt Is a Hit Any Season!


There are tons of great places at which to host your kids birthday party these days, all of which provide the "fun" and "convenience" factor. Everything from the decorations to the activities to the clean-up can be coordinated and taken care of for you, and when you're talking about occupying large groups of young children, the option of holding your child's birthday at one of those places is certainly appealing, especially in the winter months when going outside isn't really an option. Believe me, in my mind, I'm already planning my winter baby's 4th birthday party at one of those facilities.


But it's the summer, and we spend our summers living in a beach cottage by the shore, and one of the best things about this lifestyle is the laid-back, down-to-earth mentality that comes with it. Life really feels different here. People seems more relaxed, the kids spend all day outside, and we're a bit removed, even if only a little, from some of the societal pressures and expectations that seem to be mounting on our kids these days. Don't get me wrong, it's not as if we're living off-the-grid, and there are plenty of mornings I let the TV linger on longer than I should, but in general, we try to live as simply as we can.

And, hey, it doesn't get much simpler than a good old-fashioned scavenger hunt and pizza party. So that's what we did for B1's 5th birthday party. A scavenger hunt on the beach. Now, a couple caveats before you read on. This probably isn't your run-of-the mill birthday celebration. We live in a neighborhood with lots of kids, really, really nice kids, and it doesn't seem to matter what their ages are, they all know each other and play together. So we invited all of them. I think there were about 18 kids in total, ranging from 2-12 years old. Some of the kids who ended up at the party we even inherited from neighbor's with friends visiting or renters who were playing on the beach. And I was totally okay with that. I made a couple extra shirts, just in case, and everything worked out fine. But remember, you've got to adopt that laid-back attitude to go with that, but if thinking about trying to be more laid-back is stressing you out even more (and I've been there, too), you can easily tailor this for a small, distinct set of kids (and obviously, you'd save some money, too)!


How to Throw A Beach Scavenger Hunt Birthday Party 


BASIC RUNDOWN

  • Two teams (basically we just went down a line and did the ol' "one-two-one-two" to divide into teams, making sure the oldest and youngest kids were dividing appropriately--it wouldn't have been fair to stack either team
  • 30 minutes to find their items. We gave them all copies of the list but made sure to read the list aloud so that the little ones and/or those who aren't fluent readers would know what to look for, too.
  • Grand Prizes: Well, pretty much, winners get bragging rights! And as it played out, that's all they cared about, what with pizza and cake on the horizon! At the end of the game, the teams came within 10 points of each other, a pretty narrow margin, if you ask me!


MATERIALS

  • Team T-shirts: I got cute kids-size tank tops at Walmart for $2.47. There were some really little kids, too, so I got a couple Granimals tanks in toddler sizes for them. Not exactly the same color, but I was okay with that. The sizes were definitely a bit of guesswork, but I erred on the larger size, and definitely made a few trips to Walmart to switch out sizes, but everyone went home happy in the end. Then I screen-printed starfish artwork on all the shirts (find that post here). 
  • Team Buckets with Tools: Black mop buckets from the Dollar Tree with burlap ribbon from Hobby Lobby wrapped around (secured with hot glue), Rulers (Dollar Tree; 2/$1.00), Fishing Nets (our own).
  • Scavenger Hunt Items List: My primary goal was to keep them busy for 30 minutes, and this seemed like a perfect time period. We also switched it up a little here and added a "Photo" section. That part, especially, kept them busy for a while.
  • Noise-maker for Keeping Time: I had meant to pick up a whistle, but I forgot, so I asked B1 to find something that made noise, and she pulled out a tambourine from one of the toy baskets. Certainly nontraditional, but it worked! We shook it to start the hunt, at a 5-minute warning, and at the end of the 30 minutes.
  • Food: We ordered 6 large pizzas (round pies with 8 slices each), and that was plenty for the kids, with enough left for many of the parents to have a slice, too. We got them delivered, so that added to the convenience factor, and they provided us with plates and napkins (a nice surprise, although I had already purchased both!). I got two cases of mini water bottles and threw them in a cooler, and that was the perfect amount, too.


SCAVENGER HUNT ITEMS

FIND
the following & collect in team bucket:
 

  • Driftwood under 6” long (1 pt.) 
  • Driftwood over 24” long (1 pt.)
  • Shell over 4 inches long (1 pt.)
  • Shell under 1/2 inch long (1 pt.)
  • Orange jingle shell (1 pt.)
  • Black/gray jingle shell (2 pts.) 
  • 3 different types of seaweed (1 pt. each) 
  • A shell with at least 10 barnacles on it (2 pts.)
  • A twig shaped like a letter (not the letters i/I or l/L) (3 pts.)
  • Crab shell or leg (4 pts.)
  • Sea glass (clear/white-1 pt.; brown-2 pts.; green-3pts., blue-4 pts.)
  • A rock shaped like a heart (5 pts.)

PHOTOGRAPH the following (1 phone only): 

  • Beachbug (1 pt.) 
  • Flip flops (1 pt.)
  • Moon jelly (2 pts.)
  • Flower (2 pts.)
  • Seagull (2 pts.)
  • 2 people from your team on the raft - weather permitting (3 pts.)
  • Someone from your team buried in sand (don’t cover face!) (3 pts.)
  • A sandcastle created by your team (at least 2 feet tall) (4 pts.)
  • A fish caught by someone from your team (5 pts.)
  • Photo of your ENTIRE team together on the beach (10 pts.)

*Bonus: 1 point per piece of garbage collected from beach
*Bonus: 20 Points if you complete entire mission


All-in-all, this was a really fun birthday party for everyone. I knew it would be tricky to occupy so many kids of all different ages, so I stuck to my old teaching-lesson-plan-motto: prepare for every last minute! And it worked. No down-time, just fun! Scavenger hunt, pizza, and cake. That's all it took. The whole beach even broke into an impromptu touch football game as the party was winding down and the sun was setting. And I can't get sick of this story: as we were cutting the cake, one of the little boys, in a tone that was heart-meltingly-genuine said, "This is the best birthday party ever." And that's all I needed to hear.


Linking up to:

Made in a Day

seven thirty three
Skip To My Lou

Home Stories A to Z

DIY Screenprinted Party T-Shirts

Adorable DIY Customized Screenprinted T-Shirts

Starfish T-Shirts Using Simply Screen Custom Silk Screen Kit


As B1's birthday fell into the midst of our kitchen renovation, having people over to our house for a party was out of the question. Luckily, though, we've got the beach closeby! So the idea of a Beach Scavenger Hunt was perfect for this year's party.

With birthday parties, I kind of have mixed feelings about goodie bags. On one hand, I love seeing how excited the kids get when they receive one. It doesn't really matter what's inside; they just get sort of giddy at the mention of them. On the other hand, often the bags are filled with sugar (followed by the inevitable sugar crash and likely tantrums) and various small items (all of which their baby brother will promptly try to ingest and I will spend the next 5 days picking off the floor before I finally get so fed up that they end up in the trash can). Hence, the mixed feelings.

So in an attempt to avoid the sugar overload,I came up with the idea of making tee shirts for the scavenger hunt. And that would be it; the tee-shirts would serve as the goodie bags. Just to spice it up a little I decided to use two colors; so, two teams, each of which would collect items to gather points towards a team total.


I was going to try to get shirts at one of the craft stores, but I ended up finding cute Hanes tank tops in the boys section at Walmart for $2.47. At first I planned to stencil a shape onto the shirts, but I couldn't find one I liked at Hobby Lobby, and I had run out of time to order one. Same deal with iron-ons; no sea life options (kinda need sea life for a beach party). Then as I was walking down the aisles, I noticed the Simply Screen Custom Silk Screen Kit. I'd never done screen printing before, but at $39.99 minus $16.00 (gotta use that 40% coupon), I figured it was worth a shot. I bought the kit and 3 tubes of white Simply Screen paint (but I only ended up using about 1 and a half tubes).  

The process was pretty simple, and the directions are very clear (although doing it over and over again 20 times did start to get annoying). But I think they turned out great, and the kids definitely wore them well :)

Simply Screen Custom Silk Screen Kit for Custom Scavenger Hunt Tee Shirts Process


  1. Create Your Artwork: I made the starfish in Illustrator and printed it out using a regular ink-jet printer.
  2. Place Artwork on Screen: Secure using masking tape around all 4 sides. Then place a pane of glass from a picture frame on top.
  3. Complete the Burning Process: Place everything inside the box and turn on the light for 25 minutes.
  4. Wash the Screen: Gently clean the screen in lukewarm water (using the tub and sponge provided).
  5. Place Cardboard Inside Shirt: I used the front of a cereal box.
  6. Tape Screen Onto Your Shirt: Make sure the screen is dry first or tape won't stick!
  7. Squeeze & Squeegee: Squeeze paint onto top of screen and use the squeegee to pull it down onto the design. I went over it a couple times like this, making sure to press really firmly on the last round.
  8. Carefully Remove the Screen: And put your shirt somewhere to dry!
  9.  
I'd be lying if I said that all the shirts came out perfectly; there were certainly many small flaws, but for the most part, they looked great, and the kids were really excited about them. You can see from the pics that I used a few different types of shirts. Most are the same style, but I got a couple larger t-shirts just in case an older kid needed one, toddler-sized tanks for the tots, and I also made tanks for 4 of the best babysitters in the world because they helped corral the kids during the party (not to mention how much they help with my kids all summer)!


But back to the shirts: I can definitely see myself using this kit again. It comes with 3 screens (I had to use the largest one for this print), but you can buy new ones for different designs.  If you like the starfish print, click on the image below for a high-resolution copy.  The whole process really was quite simple; the most painstaking part for me was repeating it over and over, but the end result was worth it, and I didn't have to mess around with compiling bags of candy and cheap toys.  My biggest fear was hearing the kids ask, "Where are the goody bags?" but I was thrilled when the party came to an end and I didn't hear that question at all (unless it was asked out of earshot, of course)! So in my mind, success! And totally worth mastering the art of screenprinting in a box :)


Want the starfish clipart for yourself? Click on the image to open and save it to your own computer!