Google+

Friday, January 31, 2014

DIY Rustic Olympic Banner

Easy Olympic Games Decoration {for Kids or Adults}!

Get into the Olympic spirit with this simple craft


While I'm not going win any medals (chuckle, chuckle: pun sooooo intended) for accuracy with this project, it was fun and SUPER easy, and does its job to convey the general theme of the Olympic rings. I used a drop cloth for the banner/background of the rings, but technically, the background of Olympic rings should be white. As you can imagine, there are a lot of specifications when it comes to the creation and usage of the official Olympic symbols, but I'm bending the rules a little with this project :) So bear with me!


Contributor at Ginger Snap Crafts!

Happy Friday!

Did you know that I'm part of the contributor team at Ginger Snap Crafts?


Well, I am! And I'm so excited to be included in the group of talent and creative bloggers on the team! My post is up today, so head on over and check it out! And if you're new to Ginger's blog, I'm sure you'll end up staying there a while--it's filled with awesomeness :)


Tuesday, January 28, 2014

Winter Blues Got You Down? Start Planning a Family Getaway!

How to Plan an Enjoyable and Affordable Family Vacation

Announcing a New Series for February!
Take-a-Trip Tuesdays: Stress-Free & Fun Tips for Travel with Kids

Remember those times when your vacations consisted of simply lounging around and relaxing? When you could wake up late and take your time deciding what fun activities you'd do that day? Go surfing or play tennis? Take a hike or explore a new city? Sunbathe by the pool and read a book without interruption? Sadly, as a parent to young kiddos, that version of a vacation is no longer the same (at least for a few years).  But don't let that scare you off! Things may be different now, but it's still possible to have a fun and relaxing vacation, even when you add your kids into the mix. It's easy to shy away from traveling with kids, especially young ones, but with some careful planning and a {mini} shift in expectations, you can enjoy your family vacation, and even return home feeling rested!


Monday, January 27, 2014

Meatless Mondays in January

Check out the Four Vegetarian Dinners We Tried This Month

Meatless Monday is gaining some momentum here!


Photos by Original Recipe-Makers
Smoky Sweet Potato and Black Bean Tacos
Cannellini Bean Vegetarian "Meatballs"
Spaghetti Squash Mac & Cheese
Creamy Gnocchi, Butternut Squash, and Spinach


While my family's been practicing Meatless Mondays for about a year now, this is my first month of sharing about it on the blog. My struggle has been to find vegetarian meals that my kids (and my husband) will enjoy as much as me! The four dinners we tried this month were certainly strong candidates. While we didn't have a particular meal that we all could agree was tasty enough for a "thumbs-up," I'm happy to announce that everyone at least liked one of the dinners! I think we're making progress!

I've mentioned this before, but it's worth repeating: I can't cook, and I don't like to cook. That often comes as a surprise to people who think that being crafty and being a good cook go hand-in-hand... well, feel free to use me as an example to dispel any myths about that!

Since I'm not lucky enough to be blessed with culinary talents, I MUST rely on a recipe to make a meal. I have never understood how people can just look in at a bunch of spices and ingredients and be able to make a meal... I've tried, believe me! I've just never had success. So, I rely on my recipes, and these days I get most of them on Pinterest. That's where I found a few of the four awesome recipes I made this month. A couple other I found on Yummly. Here they all are, with the links so you can make them yourselves!

Hope you find something you like! I have to say, the Sweet Potato Tacos were probably my favorite this month, but everything else was awesome, too! Do you have a Vegetarian Recipe that works for kids and adults alike? I'd love if you'd share! Leave me a comment in the post or write me an email. Maybe I'll make it next month!

Connect with me on Instagram and Pinterest to keep up with our Meatless Monday adventures!


Linking up to:


Thursday, January 23, 2014

An Organized Laundry Folding Station

A Laundry Center that Holds Everyone Accountable ;)

with Free Printables {in 6 colors!} to Make Your Own


When we moved into our new house last year, we had to make some adjustments because it was a smaller space. And while I'm perfectly happy to downsize (in general I think we've come to rely on more things and space than we actually need), I did have some struggles getting used to my new "laundry room" (i.e., a closet with stackable machines).

Since the laundry closet is located in our upstairs hallway, I did inherit the convenience of not having to haul our laundry up and down the stairs for each load. On the other hand, I had no space to fold or organize anything when it came out of the dryer (well, that's not entirely true. I would often toss it all on top of one of my daughters' beds, but that created a whole bunch of other issues).

http://thrifterindisguise.blogspot.com/2014/01/milk-paint-drop-leaf-table.htmlI decided that what I needed was a drop leaf table somewhere in the hallway; I wanted a piece that wasn't overwhelmingly large but had the versatility to accommodate more space when I needed it. Now that I knew what I wanted, I watched Craigslist for months to find the perfect piece (this was harder than it sounds. I needed a specific size in a specific price range--I didn't want to spend more than $30). Finally I found the right table, negotiated it to the right price ($20!), and after a little makeover, my Laundry Station was finally coming to life!


Creating a Laundry Station


As happy as I was with my new space, I still had more work to do. Living with three little kiddos, I feel like a ridiculous percentage of my days are devoted to cleaning up after them. And they're still young, so I give them some slack... but it's about time they started taking more responsibility for their things, and I thought this would be an easy way to start. Now, when clean laundry is folded and sorted by person, it's placed into a nice, clean laundry basket with a personalized label. Neat, organized, and pretty! And so so so easy. And to make it just a little more fun for the kiddos, I chose to use their FAVORITE different colors for the tags.


To Create This Laundry Station, You'll Need:


  • Small Laundry Baskets from Dollar Tree
  • Closepins
  • Laundry Letter and Icon Tags (Free Printables Below)
  • Printer and Printer Paper
  • Scissors 
  • Hot Glue Gun and Glue

A Few Tips on the Process
  • I used cardstock (125 lb) to print the tags, but if you don't have any, you could attach the tags to some thin cardboard (like from a cereal box) to give them a little more stability. If you have access to a laminator, you may want to consider laminating them, too, just to add extra durability.
  • I used regular ol' scissors to cut out the letter and icon tags.
  • Use hot glue to attach the tags to the closepins.


I like this system because it allows me the flexibility of labeling the baskets ONLY when I need to. This way I don't have a bunch of baskets hanging around for no reason. When the tags aren't in use, I just clip them onto a little basket until I'm ready for them.


Download Your Own {FREE!} Laundry Letters and Icons Here


Yes, they are free! All I ask if that you leave me a comment in this post letting me know which color you're choosing and/or how you'll be using them! Not a "commenter"? That's ok! Follow me on Pinterest instead! And enjoy!!

Laundry Station Letters {in Blue}
Laundry Station Letters {in Olive Green}
Laundry Station Letters {in Violet}
Laundry Station Letters {in Pink}
Laundry Station Letters {in Orange}
Laundry Station Letters {in Turquoise}


I hope you enjoy the tags (and that they help you recruit some new laundry helpers)!

 Let's connect! I'm most active on Pinterest and Instagram.


Featured On:
The Crafty Blog Stalker

Wednesday, January 22, 2014

American Girl Doll {Valentine's Giveaway}

Valentine's AG Doll Giveaway 

I'm so excited to be a part of this American Girl Doll Giveaway for Valentine's Day (from today until February 3)! You can win a gorgeous AG doll AND the sweetest little custom-made wardrobe for her. Get your entries in now! The more entries, the better chance you have to win! Details are below. Good luck!


Back by popular demand is another American Girl Doll & Wardrobe giveaway. Our first one was so successful that we've decided to make it a series. This second giveaway is Valentine's theme. This fabulous giveaway is brought to you by the following co-hosts, sponsors, & contributors~


1. Diana of Diana Rambles - Diana aka FreeStyleMama, the host of this giveaway, is a self-described creative crafty mama of 3 who blogs about food, crafts, family & fun. She also is a blog designer & seamstress.
2. Amy of SewsNBows - Amy is a fabric hoarder and sewing pattern collector who enjoys sewing children's clothing and accessories. Her beautiful creations are showcased on her blog.
3. Charlotte of Saving with Charlotte - Saving with Charlotte is family friendly and if it doesn't pass the grandma test, it doesn't get posted on my blog. Charlotte blogs about a variety of topics, including: Kids Crafts & Activities, DIY, Simple Household Solutions, Recipes, Misc. Deals & Promotions, Product Reviews, Free Samples, and Much More!
4. Linda of Crafts a la mode - Linda loves to make things.. crafts, DIY, even fun food.
5. Lisa of Crazy Adventures in Parenting - Lisa Douglas is an Army wife raising seven kids sharing humorous parental war-stories, yummy homemade family-friendly recipes, craft tutorials, hilarious family videos, and much more at CrazyAdventuresinParenting.com. Lisa's on a journey to savor every "small" moment, finding the humor in the joy in everything (even diapers and laundry).
6. Lynn of Turnips 2 Tangerines - Turnips 2 Tangerines is Lynn's Little Kitchen in the Big Woods of Northern WI is where she shares with you, her family tested and approved recipes, kitchen tips and many adventures traveling throughout Wisconsin.
7. Stephanie of The Tip Toe Fairy - Stephanie is a stay-at-home mommy to 3.  She blogs about crafting, cupcakes, book reviews, and more.
8. Stephanie of A Geek in Glasses - Stephanie loves all things Vintage and crafty and her house shows it. She just got AG Doll Molly McIntire for Christmas because she wants to have a Victory Garden and loves all things 1940's!!!
9. Gina of Gina's Craft Corner - This blog follows Gina on her journey as she learns to sew.  She mainly focuses on turning upcycled material into something beautiful.
10. Kristen of A Thrifter in Disguise - A self-described thrifter, Kristen blogs about finding creative ways to find savings without sacrificing style. A mom of 3, she loves creating crafts and activities to keep her kids busy.
11. KC of The Real Thing with the Coake Family - KC is a stay at home mom of two cuties who are 11 and 7. She blogs at The Real Thing with the Coake Family which is about living the creative life with her family, while keeping it real along the way.
12. Laura of Laura Kelly's INKlings - Laura Kelly is a licensed artist and creative project designer in addition to being the resident dyesigner for the Rit Studio and an inaugural member of The Sharpie Squad.  She blogs her journey with hopes of inspiring and stimulating creativity in others.
13. Jenny of Learning and Growing the Piwi Way - Jenny is a proud wife and mama who enjoys blogging about teaching her kids, the books she reads and food. With another job relocation always just over the horizon life most of the projects she writes about are an attempt to distract her from packing.
14. Janine of Janine's Confessions of A Mommyaholic - Janine is a wife and mom to two little girls 16 months apart. She blogs about being a mom and so much more, and also designs blogs and offers blogging advice.
15. Corinna of For My Love Of -Corinna is a bold and eclectic DIY decorator. She loves to reinvent and create pretty things and blogs about it at for my love of blog.


Emily of Naptime Creations  Harriet of Posh on a Budget
Ayelet of The Graceful Rose  Millie & Kristina of 2 Crochet Hooks
Nina of Mamabelly's Lunches with Love  Sonnet of SohoSonnet Creative Living
 Lisa of Chronically Content  Barbara of Barbara's Beat
FreeStyleMama - 2 dresses  SewsNBows - 2 outfits
CatsMeow1 - dress  The Graceful Rose - dress & headband
The Tip Toe Fairy - tutu & fairy wings   Gina's Craft Corner - doll tote
Domestic Bliss Squared - crocheted accessories   Tickie's Time - coat & boots
  xoxo Grandma - dress & necklace   2 Crochet Hooks - poncho & accessories
Eden Ava Couture - complete outfit   GiGi's Doll Creations - bedding
Meatloaf and Melodrama - outfit   Keema Kids - outfit

Pixie Dust Doll Clothes - outfit   Two It Yourself - matching chair envelopes
Doll It Up - complete outfit   Laura Kelly's INKlings - ladybug costume

Enter the giveaway using the Rafflecopter entry form below.
US and Canada Only. Official Rules at bottom of the entry form.
Bonus entries unlocked after required entry.
The more entries, the better chance you have of winning.
a Rafflecopter giveaway

Monday, January 20, 2014

DIY Crepe Paper Party Banner

Make a Sweet & Simple Banner for Just a Few Dollars

A custom look in 5 easy steps


As I was finishing up the details for my 4-year-old's birthday party last month, I realized that I wasn't really happy with any of the decorations I had on hand. It just felt like something was missing. After seeing some cute buntings and fabric banners on Pinterest, I realized I'd be happiest (and save myself a trip to Party City) if I just made a version my own. This project was ever-so-simple, and I was thrilled with how it turned out.

Here's how I did it:


DIY Crepe Paper Banner Tutorial


  1. Cut 2 strips of crepe paper and place one on top of the other. My lengths varied between about 35"-37". Fold in half.
  2. Cut a triangle shape out of the ends to give the tails a "ribbon" look.
  3. Starting in the center of the strips, gently twist the paper together, around and around, until you have about 2" of a tightly-wound strand.
  4. Grasp the streamers together at the top, and make a loop by twisting the sides around each other. You could probably use glue to secure the loops for good, but I didn't, and it still looks great. --Repeat Steps 1-4 until you have enough pieces for your banner.--
  5. Cut a piece of twine or yarn to your desired length, decide on a pattern, and slide the loops onto string. Hang and enjoy!


During the party, I got tons of compliments on the banner, and I actually ended up liking it so much, it earned a permanent spot in the playroom!

I'm looking to add more ideas to my party arsenal. What are some other party-decorating tricks you use? Do you buy decorations new for each event or do you reuse them? Let me know!

Like what you see? Connect with me on Instagram and Pinterest and be the first to know about my latest DIY adventures.

Tuesday, January 14, 2014

Tuesday's Takes on Meatless Monday Meals

Source: Cinnamon Spice & Everything Nice

January 13: Creamy Gnocchi, Butternut Squash and Spinach


If you follow me on Instagram or Twitter, you may have seen some of this dish in the making last night! The recipe is by +Cinnamon Spice & Everything Nice, and I found it through +Yummly .

Although it put my cooking stills to the test, I considered it a success. It smelled great, it looked great... it was definitely a thumbs-up from me. And surprisingly, Ben gave it a thumbs-up, too (he tends to be a Meatless Monday Grouch)! The kids were mostly just fans of the Gnocchi (oh, and the cheese of course), but I think the sage may have been a little strong for them (although it doesn't help that R dumped in ALL of the sage I cut up after I told her to add "a sprinkle").

But overall, a success. The only thing that would have made it better would be a nice loaf of crusty french bread to dip in the sauce! But alas, I'm only allowing those in the house once a week these days, and we just had French Onion Soup the other night ;). Here's an Insta-Review:

I got pre-cut squash to save a few steps.
This is about when it started to smell delicious!

Wilting is about to begin ;)

My helpers


As far as the cooking process, it was a little tricky for me (but please don't let that discourage you--remember, cooking is NOT a strength of mine... and that's an understatement). I definitely think I "over-salted" and probably should have cut up MUCH less sage in the first place so we could have avoided the sage overload. But it all worked out. Ben liked it, and I had enough left over for lunch today! I actually may try it with basil next time since she gave that as an option, too. I LOVE basil... come to think of it, I don't know why I didn't try that in the first place.

On a side note, I've decided that instead of posting about the previous meal EVERY Tuesday, I'm going to do a Meatless Monday Roundup on the last Tuesday of each month instead. I think I'll be able to organize my thoughts better that way (and that it'll be more useful to other families looking for +Meatless Monday ideas.


Follow me on Instagram and Pinterest for more fun ideas.

Saturday, January 11, 2014

Milk Paint Drop Leaf Table

From Disaster to Divine

Warning: MMS Milk Paint May Play with Your Emotions ;)


I'd been searching for a drop leaf table for some time, but I could never seem to find one that met my size and budgetary needs, until this one. Purchased through Craigslist (yup, another one of my Craigslist's finds) for a mere $20, it was the perfect piece for me to experiment with the Miss Mustard Seed Milk Paint I'd been dying to try.

Since there aren't any MMS retailers near me, I opted to buy online from the retailer who was geographically closest to me, Sea Rose Cottage in RI (a cute shop I can't wait to visit next time I'm in the area). Since I desperately wanted to obtain the "chippy look" (and I'm always trying to save money), I opted to risk skipping the bonding agent (anyone see where this story's going)? For those not familiar with MMS Milk Paint, the bonding agent is a substance that gets added to the paint in the event that the paint doesn't adhere properly to your surface (to facilitate the "bond"). So, I purchased one bag of Eulalie's Sky (the paint comes in a powder form) along with a container of Hemp Oil. Simple enough? Well... so I thought.


Source: Instagram

When I finally got some alone time to spend with my table and my Milk Paint, I was thrilled! I used a paint stick to mix the paint (this was trickier than I thought; I had a hard time getting all the powder to dissolve). Being used to chalk paint, I was surprised at how thin the consistency of the milk paint was, but I had watched a few tutorial videos, so I knew I had to keep an open mind and expect a different experience. And although I heard Marian say over and over in the videos that you can't always predict how it the paint will act, I was hoping with all my heart that my piece + my paint would = my desired chippiness.

After one coat I couldn't tell what was going to happen. It wasn't quite bubbling that much (which would indicate an area that would easily "chip"), but I did see it happening in some areas. So I decided to apply another coat... and that's when it happened. Bubbling overload.

Everything bubbled up (and consequently chipped off as soon as I touched it). And, yes, hindsight being 20-20... I should have ordered the bonding agent. Soooooo, back to the internet, another order (and another shipping charge). And this time I ordered the milk paint mixer, too, because of the trouble I had mixing it last time (the device is basically a milk frother, so if you have an extra on hand, you could use that).


But after receiving the next package, a cold spell ensued (and the table was in the garage). So the cold, mixed with my earlier disappointment, caused the drop leaf table project to come to a halt.

Fast forward a couple months later, and I became determined to finish the project (and this time I moved the table inside). And I'm so happy (and very relieved) with the final results. Here's how it went.

I can't find my original "before" pics, so this is the closest I can get. This is between "Take 1" and "Take 2." I actually sanded the top after the first debacle, so it originally looked a little darker than this.

Steps for Painting the Drop Leaf Table with MMS Milk Paint (and an ASCP Stripe)

  1. Mix the paint (and in my case, add the bonding agent). I recommend using the electric frother-mixer.
  2. Paint! And paint some more. The paint is thin (although you could adjust this by adding less water, but I didn't have much to work with, so I was stuck with what I had)! After reading the directions, but after mixing the paint (yea, in general, I tend to have some trouble following directions), I found out that you only need to add the bonding agent on the first coat. But I had already mixed it all together (because I only had about half a bag of powder left). So the bonding agent was in the paint for each coat. My mix lasted me about three coats (although certain parts could have taken another coat, but I wasn't going to buy a whole new bag for that).

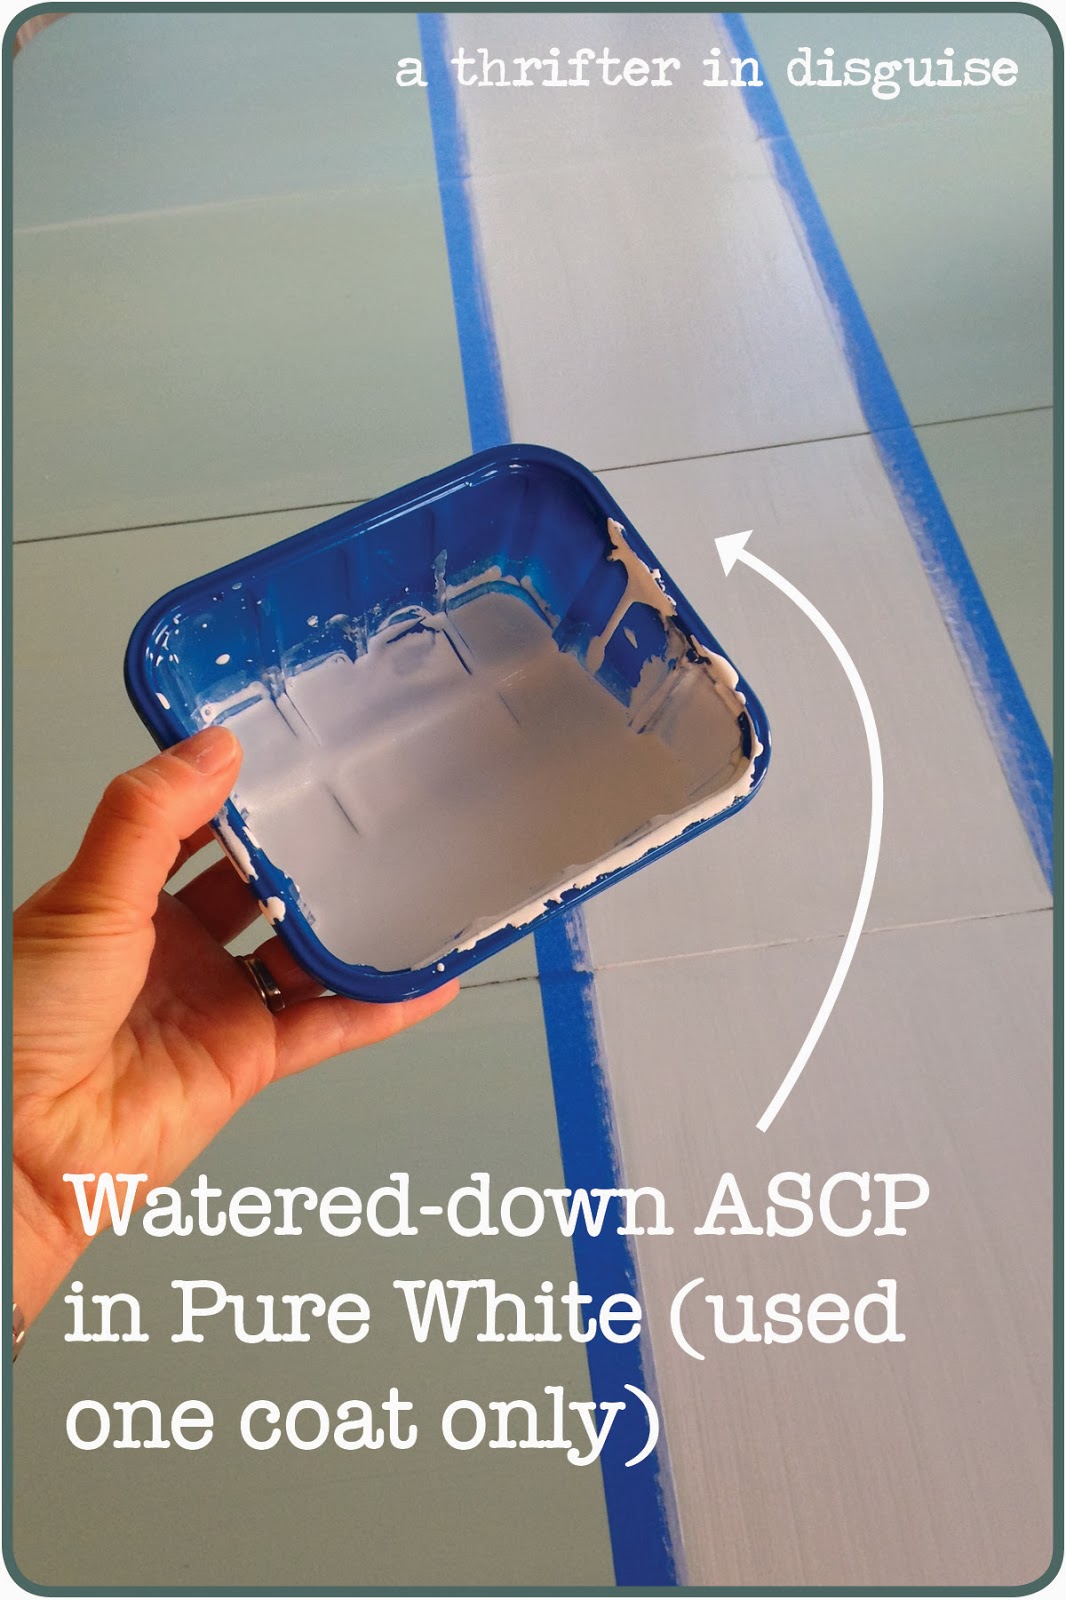
  3. Add the stripe. Although I was happy with the color of the paint, I thought the table was a little boring, so I decided to add a stripe. I had Annie Sloan Chalk Paint in Pure White on hand, so that's what I used. I wanted the stripe to be subtle, so I watered down the paint and only applied a thin coat.


  4. Distress. As Marian suggests in her videos, I used a paint scraper to distress the table. Although I had to work pretty hard at it (that bonding agent sure did its job!), I still liked this process SO MUCH better than using sandpaper or nail files (that's what I used on my Distressed Dining Table). I just can't stand how HOT the sandpaper/files get because of the friction when you're working... it gives me stomach-churning goosebumps, the way some people feel about fingernails on a chalkboard. Yuck. I don't even like thinking about it. Soooooo the paint scraper was the best idea I've heard in a while! Nice plastic handle = no friction on my fingers!


  5. Apply the Hemp Oil. This was my favorite part! I used a cut up old tee-shirt to apply the wax, and the consistency was so nice. As soon as it touched the paint,  a lovely hue emerged, making me soooo happy. Before this step I was doubting I'd use MMSMP again, but after using the hemp oil (and a little experience behind me), I think I'm going to give it all another shot! I followed the instructions and wiped the excess oil off after 30 minutes.


So there you have it... I never knew a paint would have the ability to make me cry, cringe, smile, and shout, but I guess you learn something new every day :) I'll be using the table in our upstairs hallway as our new laundry-folding station (to replace the current "station": B1's bed! Now I don't have to feel guilty if I don't finish folding all the laundry by bedtime!).


Here's one of my laundry helpers ;)
Top View: I'm so happy I added the stripe!

Have you used Milk Paint? What have you used it for? Do you like it? After all this, I need someone to commiserate (and celebrate) with ;)


Follow along on Pinterest and Instagram for more of my DIY adventures!


Featured On:

http://www.somuchbetterwithage.com/2014/01/sunday-features-43/#more-5056
The DIY Dreamer