
Image Maps, Where Have You Been All My Life?
Image Maps Adds an Air of Sophistication to Your Blog

Image Maps enables you to create custom headers and menu bars?! Oh my. I am on Cloud 9. I'm in a blur, a daze... I'm beyond happy! I just discovered Image Maps, by far the most amazing thing that has ever happened to my blog. I am in LOVE!
But at the same time I'm a little upset. Why didn't I know about this before? What could I have accomplished for, years, with this amazing little tool? It's as if we were living in parallel universes, always reaching out for each other, but never making contact. Until now. But there's no use ruing the past. I have embraced the future: a bright future, made even brighter because of Image Maps! And it's absolutely free!
My biggest stumbling block as a blogger has been, in essence, not being able to get my images to do what I want them to do, specifically, an inability to separate sections of my images into distinct clickable units. Because I didn't know how to do that, I've been limited in my capabilities. Uploading multiple images and getting them to "behave" together in Blogger is a bit of a nightmare. But with Image Maps, those problems are gone! And a big thanks to Ashton from Something Swanky for all of her amazing blogging tutorials--that's where I first learned about Image Maps!
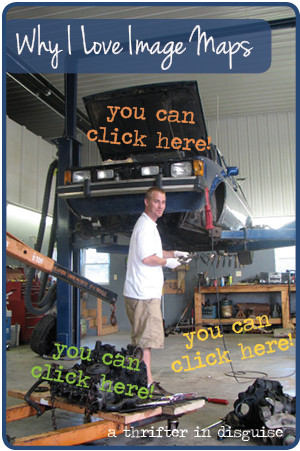
So, to demonstrate, I linked up this photo of my husband in the workshop where we used to live (where he actually had space to work on cars). In this pic he's working on converting this old diesel VW Rabbit truck to run on vegetable oil. Usually I'm posting much more girly photos, but today, I'd like to think of this demonstration as an homage to my husband, as we celebrate our 6th anniversary in a couple days :)
Try it out! The orange text (hood of the car) will take you to the Greasecar website (that's where husband got the kit to convert his diesel VW Rabbit to run on vegetable oil). The green text (there's a motor under that) will take you to TDI forums (husband gets/offers lots of car advice here). The yellow text (shop floor) will take you to a page on my site with a random sampling of some of the cars husband worked on in that shop. And, of course, the "Why I Love Image Maps" banner links to the Image Maps site! Cool, right?
It's so easy. Here are the steps to use Image Maps to improve your blog:
- Create your image (I use InDesign; PicMoney is awesome and more user-friendly if you're not comfortable with Adobe CC. Refer to Ashton's Something Swanky Blog Tutorials as a great PicMonkey resource).
- Upload your image to a image hosting site (I use Photobucket because I think it has the cleanest interface).
- Copy the DIRECT link (I turn on "Easy Linking Mode" in Settings->Album to find this more quickly. Otherwise, click the gear-> get links, then copy direct link).
- Go to Imagemaps.com and paste your link into the "From a URL" box. Submit it, and wait until the next screen.
- Use the rectangles (or custom shapes) to begin designating linkable spots in your image.
- I unclick "Show Text Links" because it looks cleaner, but if you leave them, it will probably help with your SEO.
- Click "Get Your Code," and on the next screen, click "HTML Code." Copy your code.
- Paste your code where you want your image to show up (make sure you're in HTML mode).
You'll notice the Image Maps interface itself is nothing to write home about (def not girly), but all the information you need to use it is there, and with its awesome capabilities, I couldn't be happier!
Now back to the girly stuff... wondering where to see this in action on my blog? Look up! The six large menu buttons on the top of the site were linked using Image Map.
And that's it. I'm sure my header and menu will continue to have modifications over time, now that I know the potential! Thanks, Image Maps!


OMG! That is awesome! I had no idea I could do that to my images! I can't wait to try this out.
ReplyDeleteI found you on Mom's Monday Mingle. My link is for Healthy Cajun Creole. Here's the link: http://noskinnies.com/blog/2013/6/5/creole-my-way
I hope you'll stop by! Thanks. www.NoSkinnies.com
Tammy, I know, right?! It's the coolest thing! Have fun with it, and let me know if you end up using it on your site so I can see!
DeleteThank you so much for sharing! I can't wait to check it out.
ReplyDeleteSarah M Schultz
Hi Sarah, hope you can use it somehow. It's fun to play around with!
DeleteGreat, thanks for the tips!
ReplyDeleteHi Tara, hope you can use it. Only wish I found it sooner!
DeleteGreat tips! I am going to "Pin It" so that I can keep for reference.
ReplyDeleteGreat idea, Susan! I have a "blog" board on Pinterest, too! That way, when I get time, I can go thru it and see what I can add to my blog!
DeleteThanks so much for this information!!! I can't wait to try it out!
ReplyDeleteI hope you find it useful, Charlene! If you end up using it, let me know. I'd love to see how other people are using it, too!
DeleteI have been using image maps on my blog for a little while now, but recently I noticed that the image maps themselves have been showing up as blue boxes whenever I click on them. Have you ever had this happen? I can't seem to fix it and it's driving me crazy!
ReplyDeleteHi Allison, I haven't had that particular problem. Are the images fine until you click on them, and only then they become blue boxes? It may be a problem of where your image is being hosted. If you're uploading the image directly to the Image Maps wesite, that could be it. I host mine at Photobucket and then paste the url into Image Maps. Is that what you did, too?
Delete